If you want to know how to clean foggy headlights, start with the basics: cloudy headlights can spoil the look of an otherwise clean car. More importantly, hazy headlights can significantly reduce visibility and make night driving less safe.
If your headlights have become cloudy and dull, oxidation and degradation of the plastic are most likely occurring below the surface. Fortunately, once you know how to clean foggy headlights, this type of haze can be fixed at home with proper cleaning and restoration.
So, how do you clean foggy headlights without damaging them?
When learning how to clean foggy headlights, the first step is to diagnose the problem. Light surface contamination can be dealt with simply through some washing, while oxidized lenses will need to undergo a comprehensive headlight restoration process. Knowing this helps you choose the right method instead of wasting time on a fix that only works temporarily.
Why Do Car Headlights Become Foggy?
Modern cars commonly use polycarbonate plastic instead of traditional glass for their headlight lenses. Even though polycarbonate is lighter and impact-resistant, the surface of the material is still prone to wear and tear.
Although manufacturers add a protective coating over polycarbonate, it wears down over time.
Several factors contribute to cloudy and yellowed headlights — and understanding them is the first part of learning how to clean foggy headlights.
1. UV Exposure
Sunlight is the main cause of the yellowish, dull appearance of headlights. Ultraviolet rays gradually damage the outer protective layer of the lens. Once this layer starts to break down, the plastic underneath becomes increasingly exposed to oxidation. Cars that are regularly parked outside tend to face this problem.
2. Road Dirt and Environmental Contamination
In Canada, roads dirty vehicles far more than simple road dust would suggest. Road salt, dirt, mud, debris, and other kinds of pollution build up on headlights. If such deposits are not regularly removed, they will make the headlights look cloudy and impair their clarity.
3. Oxidation and Surface Deterioration
Oxidation is the process by which the outer surface breaks down through natural exposure to environmental factors. This leads to a cloudy, yellow, or rough appearance. Ordinary car wash shampoo cannot fix this damage, because the problem is not dirt on the surface of the lens.
4. Weather and Temperature Changes
Headlights are exposed to changing temperatures, moisture, sunlight, and seasonal weather. In Canada, exposure to winter and summer conditions, as well as road debris, gradually deteriorates the outer surface of headlights.
How to Tell Whether Your Headlights Are Dirty or Oxidized
Before you start learning how to clean foggy headlights, determine whether the haze is on the outside or inside the lens.
This matters because exterior cleaning cannot fix internal moisture or damage.
Signs of ordinary surface dirt:
The headlights may appear dusted or covered in some gravel dirt. The surface seems dirty rather than rough or deteriorated. A simple washing helps to make it look better.
Signs of oxidation:
The lens has a yellow, milky, or cloudy appearance. The haze will remain even after washing. The surface may feel rough or seem worn out. The cloudiness is rather even across all lenses exposed outside.
Signs of an internal problem:
Moisture droplets or fog appear in the headlight. The fog will stay even after cleaning the outer surface. There are cracks or damaged seals, or water inside the body. Internal fog, damaged seals, or serious deterioration of the lens may need professional examination or replacement of the lens, since the external restoration kit will not be able to fix the matter.
How to Clean Foggy Headlights at Home
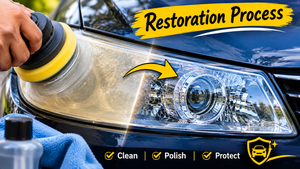
If the cloudiness is caused by exterior oxidation, a dedicated headlight restoration kit is generally a better option than ordinary household cleaning products.
The following process explains how to clean foggy headlights safely, step by step.
Step 1: Park Your Car in a Shaded Area
To start learning how to clean foggy headlights, locate a flat space to park your car in a shady area. Make sure the headlight surfaces are cool before you start to work. Working in the sun can dry cleaning products too quickly and make the job harder. Do not start working until the lenses are cool. Be sure to switch off the car and gather all necessary materials.
Step 2: Wash the Headlights Thoroughly
Use automotive shampoo and clean water to remove dirt and grime. Rinse the headlight lens in water. Wash the headlights with shampoo, using a soft microfiber wash mitt. The goal of washing the headlights is to remove all surface contamination while eliminating the chances of scratches. If your headlights are clear after washing, that means there is no oxidation problem.
Step 3: Protect the Surrounding Paint
Before using any restoration products, place automotive masking tape along the perimeter of your headlights. The purpose of this activity is to cover the surrounding paint, plastic trim, and rubber seals so that these parts do not get scratched. Ensure that the tape is firmly attached and all areas near the lens are covered. This step is especially important if the restoration kit includes sanding discs or polishing compounds.
Step 4: Use a Dedicated Headlight Restoration Kit
When you know how to clean foggy headlights with heavy oxidation, a restoration kit that is designed specifically for automotive headlights should be used for headlights with damage on the outer layer of the plastic. The contents of the kit will depend on the supplier, but it may include sanding materials, polishing compounds, applicators, and a finishing treatment. Always follow the manufacturer’s instructions, as restoration kits may use different processes. There are kits that use a process of wet sanding with abrasives for removal of the outer layer of damage. Other kits can have a polishing process that is used for lighter damage. In case the instructions don’t say otherwise, don’t start using a strong abrasive.
Step 5: Sand Only When the Restoration System Requires It
Choose a restoration kit that contains sanding materials, then follow the instructions on the packaging carefully. A restoration set typically works by using abrasives of successively smaller size to fix any oxidation issues or clean the lens surface. Make sure you lubricate the lens properly if using wet sanding methods. Be careful not to skip grit ranges and use only products designed specifically for headlight restoration. If done improperly, sanding can leave severe scratches or create surface irregularities, or cause irreversible damage to the surface. If you do not know how to perform this process, it’s better to contact professionals for assistance.
Step 6: Polish the Headlight Surface
The polishing step is what brings back the shine when you learn how to clean foggy headlights: after you have finished the prep or sanding step, take the polish that comes with your restoration kit or that you have been instructed to use. Use it as recommended so that you can cover the whole lens evenly. This polishing step is important because it smooths the surface of the headlight and improves its clarity by minimizing fine marks left during restoration. Wipe away any residue with a clean microfiber cloth, following the directions provided. By now, the lens should look clearer if the cloudiness was caused by an external factor you were able to fix.
Step 7: Apply a Suitable UV Protective Coating
Restoring clarity is only part of how to clean foggy headlights. The exposed lens requires added protection as well. Most headlight restoration kits come with a UV-protected seal or tint. This will protect the restored lens surface. Make sure the protective material is applied as directed. Some of the products have a drying period during which nobody should touch the headlights. Do not assume that every automotive ceramic or graphite coating is suitable for a polycarbonate lens. Use only products the manufacturer states are compatible with polycarbonate lenses.
Common Mistakes to Avoid When Cleaning Foggy Headlights
A quick online search may suggest several household tricks for cloudy headlights. However, if you are learning how to clean foggy headlights, not every popular method is suitable for long-term restoration.
Here are some mistakes worth avoiding.
Using Toothpaste as a Permanent Restoration Solution
Toothpaste is sometimes used as a light abrasive to make cloudy plastic look better, but it is not a real headlight restoration product. While it can improve surface fogging marginally, the method is not effective for removing heavy oxidation or loss of UV protection.
Using Harsh Household Cleaners
Powerful chemicals, solvents, and improper cleaning products may damage plastic lenses or their protective film. It is always best to go for car products that are designed for the material you are working with.
Skipping UV Protection
Skipping UV protection is one of the worst mistakes you can make when restoring headlights. Cleaning the oxidized layer and not applying the necessary protective treatment will leave the plastic exposed to the influence of the environment. The lenses may become cloudy again much sooner than it is expected.
Sanding Too Aggressively
More sanding does not mean a better result. Overuse of abrasive materials, applying too much pressure, and neglecting the order of sanding will leave scratches and uneven surfaces. It is better to follow the restoration kit instructions instead of trying other abrasive materials on one’s own.
Ignoring Internal Condensation
If there is moisture inside the headlight assembly, cleaning its outer surface can’t help. If there is a constant moisture presence, it may mean that there is something wrong with the seal, blockage of the ventilation, or a crack in the housing.
How to Prevent Headlights From Becoming Foggy Again
Once you know how to clean foggy headlights and yours are clean and clear, regular maintenance can help preserve their appearance.
A few simple habits can make a difference.
Wash Headlights During Regular Car Cleaning
Wash the headlights when washing the automobile. Wiping away dirt, dust, and nature’s grime is effective in preventing buildup. Instead of using harsh scrubbers or ordinary household cleaning equipment, use automotive shampoo and a gentle microfiber mitt to wash your headlights.
Park in a Garage or Shaded Area
Avoiding exposure of the headlights to direct sunlight aids in slowing the damage on the outer surface. Whenever it is possible, make sure to park your car in a shaded area or under a roof.
Maintain the Protective Layer
Use an appropriate UV-proof headlight sealant or protective layer and adhere to the manufacturer’s instructions regarding its maintenance. Once the protective layer starts flaking off, be sure to read the manufacturer’s instructions on how to reinstall the layer.
Inspect Your Headlights Regularly
Always keep an eye on your headlights for the first signs of yellowing, hazing, cracks, or moisture collecting.
Can Ceramic Coating Protect Car Headlights?
While the subject of ceramic coatings relates closely to automotive surface protection, not every coating can be applied to every surface. Certain products are meant for painted surfaces. Other coatings might be designed for plastic parts, glass, or polycarbonate lenses. A compatible protective coating can help to protect well-prepped headlight surfaces from contaminants and make it easier to clean. Nevertheless, a coating cannot reverse serious oxidation, repair damage, or eliminate condensation. Be sure to check the manufacturer’s compatibility recommendations for applying graphene or ceramic coatings to headlights.
For example, Magic Shield Graphene Ceramic Spray Coating should only be considered for headlights if the current product instructions explicitly say it can be used on polycarbonate headlight lenses. It must not be presented as a headlight restoration product or as a substitute for a proper UV-resistant headlight finish.
The proper sequence is always to restore the lens first and then apply a compatible protective product, only if the manufacturer has approved it for this use.
When Should You Replace Foggy Headlights Instead of Restoring Them?
It is not always possible to restore a cloudy headlight, even when you know how to clean foggy headlights.
A restoration product can help when the issue is limited to exterior oxidation. However, in some cases of damage, more rigorous treatment is required.
The following cases indicate that professional evaluation or replacement is advised:
The lens has deep scratches or damage that affects its integrity.
Moisture regularly gets inside the headlight.
The plastic is undergoing heavy deterioration or has sustained damage.
The headlight remains cloudy after using the restoration product correctly.
The light output is poor despite the lens being restored to its original condition.
Headlights are very important for driving. If they do not function properly, have them checked by a qualified automotive expert.
FAQ’S
1. What is the best way to clean foggy headlights?
The right strategy depends on the reason behind the fog. Ordinary grime can be wiped away by using car wash soap and a microfiber mitt. If there is oxidized plastic glare, you might need to use a headlight cleaning kit that may include sanding, polishing, and UV protection.
2. Can you clean foggy headlights with toothpaste?
Toothpaste can remove light fog temporarily as it contains fine polishing agents. But it is not a reliable solution for long-term restoration.
3. Why do headlights turn yellow over time?
Most modern headlights are made of polycarbonate lenses. Long-term exposure to UV and the elements results in the gradual degradation of the protective layer, leading to oxidation and deterioration.
4. Does washing a car remove cloudy headlights?
Washing helps to get rid of dirt, dust, and soot from lights. Yet it doesn’t usually get rid of the oxidation inside the plastic.
5. How do you remove oxidation from headlights?
An effective headlight restoration kit is usually the practical option for exterior oxidation. Depending on the extent of damage, the process may entail using methods like sanding, polishing, and applying a UV protective coat.
6. Can ceramic coating prevent headlights from becoming cloudy?
A ceramic coating can provide an extra layer of protection for polycarbonate lenses. However, it cannot reverse oxidation or replace a headlight restoration product.
7. How often should headlights be restored?
There is no specific schedule for restoring headlights. It depends on factors like sunlight exposure, parking conditions, lens condition, and durability of the protective coat. It is advisable to check the headlights regularly and restore them when there is visible exterior oxidation.
8. Can foggy headlights reduce nighttime visibility?
Yes, foggy headlight lenses can diffuse the light emitted from the headlight. Thus, if the visibility is low and reduced noticeably, it is important to check the headlights and restore them.